Search this site
15 DIY Cameras That’ll Blow Your Mind

“The history of photography is based on the experiments of amateurs,” the photographer Samuel Trachsel, who works at an analog photography store in Zurich, tells us. “Even today, a century and a half later, there is a very cool and active DIY community devoted to the craft of building cameras.”
He’s right; as of this writing, Instagram has more than 7,000 posts under the hashtag #DIYCamera and 5,600 under #HomemadeCamera. Meanwhile, The Homemade Camera Podcast with Nick and Graham features some truly inspiring ideas, while the popular Instagram account ShittyRigs show just how far photographers are willing to go to get the perfect shot in a pinch.
Even though every phone these days has a built-in camera, the allure of the DIY camera remains as powerful as ever. We asked eleven camera-makers to tell us about some of their most intriguing creations. We’ve included wooden cameras, 3D printed cameras, and even some made of old film cassettes and doll parts. You’ll also find pinhole cameras galore, creating using everything from clay to beer cans.
Each of the experts we interviewed offers a different aesthetic and point of view, but they share a passion for making the most of what they have. From professionals with camera shops to amateurs with a vision, they were also kind enough to reveal their best tips for getting started building your own.
The extraordinary creations of Alireza Rostami

Alireza Rostami, who is based in Hamadan, Iran, always had a curious mind; even as a child, he wanted to know how things worked. Today, he’s a photographer, lens researcher, and inventor of cameras. One of his first experiments, a lens technique that produces gorgeous (and affordable!) bokeh, went viral around the world a few years ago.
His goal, then and now, is to write his country’s name in the history of photography, as there aren’t yet any major international camera brands from Iran. “When Michael Zhang wrote an article about my ‘magic bokeh’ for PetaPixel in 2018, that gave me the energy and encouragement I needed to continue my research,” he remembers.


“After that, I made the ‘gadget shutter’ using the shutter from a vintage Chinese Seagull TLR, which I then turned into a wearable wrist watch-shaped camera that effectively takes pictures.” Many other innovations followed. To start, there was a view camera made with a broken LCD laptop screen; since then, he’s repurposed a number of old computer parts to create a working camera. He made film cameras using 35mm film cassettes. Most recently, he made a “talking camera” using doll parts.

Across his many projects, Rostami’s work almost always merges the old with the new. Instead of throwing away “outdated” materials–old film, computers, dolls, camera parts–he transforms them into something new. In our age of mass production and wastefulness, his oeuvre serves as a reminder of the power of ingenuity.
He hopes to inspire other young photographers and inventors to make the most of what they have, especially if it means getting creative and doing what others might have thought impossible. Recently, he found a broken FM player in the trash; he plans to incorporate it into a camera in the near future.
Pro Tip: “Never give up! In the beginning, nobody helped me build my Iranian camera, so I decided to continue my research alone. I started by researching and studying websites. It was difficult, but Google Translate was very helpful!
“From there, I started buying photographers’ broken ‘cameras’ and discovered how they worked by performing ‘autopsies.’ Get ahold of old cameras, and ask yourself how they work. Don’t get discouraged if someone tells you not to pursue your idea. You can even call me too if you have questions.”
Follow Alireza Rostami on Instagram at @alirizarostami.
Brendan Barry‘s shipping container camera

“I have always had an interest in making things,” the photographer and camera-maker Brendan Barry tells us. “As a kid, I would dismantle my toys and build new ones out of the composite parts, creating hybrid tractors or Frankenstein-ed fire engines.
“My interest in making cameras started when I was teaching photography. There is no better way to learn how a camera works than by making one yourself, so I, like many teachers, would make pinhole cameras with my students.
“We started with shoeboxes, but I began to look at other things and wonder if that could become a camera: the bin in the darkroom, an upturned table, the classroom itself. Then one day I was walking past a fruit and veg stall, saw a pineapple and thought, ‘I wonder if I could make a camera out of that?’ You can, so I did, and things snowballed from there.”


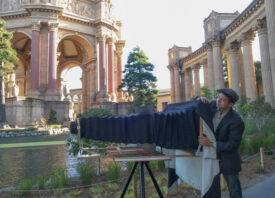
Since then, Barry’s made cameras out of watermelons, bread, pumpkins, and butternut squash, but his favorite is his shipping container camera. “This is a giant walk-in camera with a built-in darkroom, a workable teaching space capable of producing ultra large traditional analogue photographic prints,” he explains.
“The camera is wheelchair accessible, fully ventilated, solar powered, and capable of accommodating large groups of all ages and abilities. It has a built-in print washing system, lens movements and a working mechanical shutter.
“The thing I love most about it is its educational potential. Being able to operate a camera from the inside is the best way to learn the mechanics of photography: the relationship between aperture and shutter speed, depth of field, focus, etc. These are things that can be hard to wrap your head around conceptually, but when you can see them physically with your own eyes, it can establish a much deeper understanding.

“It also has huge creative potential, and I love working with diverse groups of people using it to capture portraits, landscapes, still lives or even something more abstract, and then playing with a range of different processes inside to bring the images to life.

“My ultimate dream camera project would be a boat camera! I’d love to create a camera that sails. I’m excited about all the challenges that this would produce and the potential of what it could capture.”
Pro Tip: “Mistakes are not to be avoided; they are to be embraced! Everything I know and can do comes from trial and error–trying, failing, trying again, failing a little less, trying again, and eventually getting it right. Start simple, and work your way up.
“Get ahold of an old broken camera, and take it apart; see how it works. A camera is just a box with a hole or lens at one end that lets light in, which is projected onto a light sensitive material or sensor. It really is that simple, so just have a go and see what happens!”
Follow Brendan Barry on Instagram at @brendanbarryphoto.
The B35 camera by Lucus Landers

Lucus Landers has made everything from pinhole cameras to large-format cameras, mini view cameras to instant press cameras, and he’s not slowing down anytime soon. “The motivation started very practically,” he says. “I needed a large format camera for school but didn’t have the money to buy one. So I made my own.
“At that point in my life, this mentality was very natural to me. Growing up, my family didn’t have the means to buy much. So when I wanted something, I often had to find an alternative to just going to the store and buying it.
“After my first camera, I fell down a rabbit hole. I started learning more and more about design, machining, and craft–so much so that I eventually made a whole career shift away from Photography and into Engineering.

“Today, I build my cameras around a few ideas. Each camera was designed and built with very specific goals in mind–goals that are driving me towards my idealized destination of what is in my mind the best camera in the world.
“I’m fascinated with Swiss watchmaking, so my most recent cameras have been more and more influenced by the level of design and polish that goes into them. My end goal is to make a small rangefinder camera that has the polish of a Swiss watch and the beauty and ease of use of a Leica. In short, I like small, easy-to-use, and well-made cameras that are unique to me.

“What I love about the cameras I make is that each one was designed and built to scratch a very unique itch. For instance, the most recent camera I made, the ‘B35,’ was built with stealth street shooting in mind. I wanted something small and light enough that I could fit it inside of a jacket pocket, and a quiet leaf shutter. At the time, I was researching classic clock making and wanted to incorporate these methods into the design and constitution. So far, that one has been my favorite.”
Pro Tip: “Most people get into camera building through large format, myself included. I would recommend reading ‘The Camera’ and ‘The Negative’ by Ansel Adams before building a large format. He has a lot of information on what is and isn’t important when it comes to using a camera.
“When deciding to build a camera, I would recommend thinking long and hard about how you want to use the camera. I think too often people build a camera that ends up limiting them. I think it should be the opposite. Try starting with a shooting style and an idea of the photos you want to create before making anything. This concept-driven design will often push someone to drastically expand their abilities!
“Camera making is very easy to get into, but getting good at it will take years of work. That being said, I have found it to be some of the most rewarding work of my life.”
Follow Lucus Landers on Instagram at @cropped_camera.
Heather Oelklaus’s camera truck

“For the past 28 years, I have been exploring the photographic and sculptural possibilities of homemade cameras,” the artist Heather Oelklaus tells us. ‘After dropping out of the sculpture program at the Kansas City Art Institute in 1992, I came across the most inspiring book for pinhole photographic artists: Eric Renner’s Pinhole Photography: Rediscovering a Historic Technique.
“This book gave the history alongside wonderful examples of pinhole photographs and the cameras that produced these ethereal and distorted images. Within the first few pages of the book, I was hooked. I made my first camera out of a box and a soda pop can.
“Making cameras out of existing objects is what drives me to further explore this DIY attitude toward art-making. Over the years, I have made cameras out of many unlikely items, such as a silver teapot, nesting dolls, a Wonder Woman lunchbox, a cinematic film can, cigar boxes, an iPhone box, and most recently, a dollhouse.”
Her favorite of the bunch? A bright yellow 1977 Chevy truck. “In 2012, I converted a 14’ truck, which I’ve nicknamed Little Miss Sunshine, into a pinhole camera to drive around town and to photograph the world on 84 sheets of light sensitive 8”x10” photo paper.
“These paper negatives require an exposure time of anywhere from twelve minutes on a sunny day to three hours on an overcast day. While the exposure is taking place, I enjoy sitting on a bean bag chair inside the truck watching the world transfer itself onto the delicate photo paper. These ultra large images, as big as 5’x 10’, are displayed in galleries and museums as one-of-a-kind works of art.
“Sitting inside this camera on wheels is an experience you do not soon forget. The outside image is projected against the opposite interior wall, and as your eyes slowly adjust to the darkness, the outside world appears upside down and backward.

“For me, this time inside the camera is very similar to this time in isolation during COVID-19. The words used to describe this moment in history can also be used to describe the feeling of being inside my camera obscura truck…unusual, pause, unsettled, empty, hollow, reflective, unstable, contained, disconnected, illuminated, and curious. I am in the process of making work that confronts these shared feelings.”
Decades after Oelklaus first started making cameras, she continues to find inspiration in history–and in some ways, everything has come full circle. “In 2015, I was invited by the New Mexico History Museum to shoot with the truck camera as part of their programming during the ‘Poetics of Light: Pinhole Photography’ Exhibition,’” she tells us. “On display were the same inspiring pinhole photographs and the cameras that were in the pinhole book that started me off this path of DIY camera making all those years ago.”

Pro Tip: “I keep a camera design journal to sketch out ideas and to ask myself, ‘What do I want this camera to do?’ Sometimes, the camera comes before the question, but I believe the two objects, the photograph and the camera, should be in conversation with each other. How delightful that this art form can facilitate such a remarkable union!
“For example, when I wanted to make a three pinhole camera out of a bellhop cart, traditionally used to carry baggage, I asked myself, ‘What baggage can my camera photograph?’ I first made the camera, tested it for light tightness, and studied how the overlapping images caused by the multiple pinholes distorted the photograph. Thorough testing of any homemade camera is essential for embracing the limits and the possibilities of a camera. I then proceeded to make images that reflected my ideas of emotional baggage.
“Here’s an exercise for observing the possibilities that surround you and using those observations for your own DIY camera. Take a moment and look ten feet in all directions from where you are right now. What object do you see that sparks your interest? Can you construct it into a camera? What kind of images do you want that camera to yield?”
Follow Heather Oelklaus on Instagram at @heather_oelklaus.
The CAMERADACTYL Brancopan by Ethan Moses

Ethan Moses is the creator of BUTTER GRIP and CAMERADACTYL, a pro range of 3D-printed camera parts and accessories you can buy for yourself. He’s made many cameras over the years, but his favorite to date is the CAMERADACTYL Brancopan. “It’s a 35mm panoramic camera that shoots in cinema anamorphic aspect ratio,” he tells us.
“I originally designed it for an old friend of mine, who is a bigtime Hollywood DP these days, as he was getting ready to shoot his first feature on film. He wanted a camera to shoot the same film stocks as he would be shooting a movie on, for production stills, location scouting, etc.
“I got sucked into that project for a bunch of months and came out with a camera that worked really well. I love that the camera is built like a tank and you can really whack it around and it’ll keep working. Mine has been frozen at 13,000+ feet overnight, left out next to my sleeping bag; had sand in it from hiking through the desert, and banged around on a shoulder strap all over the US, Canada, and Spain.

“I love that it’s really fast to use, and while mine is hot pink and baby blue (pro colors), it doesn’t attract too much attention for street photography so long as I mostly keep it down at my side while walking around. I love that it shoots panoramic pictures in the same aspect ratios as the movies.
“The Brancopan takes something like 120 hours to print and eight to twelve hours to assemble, which was just too much time cost to sell it as a camera or even a kit in the same way that I sell all of my other cameras on the internet.”
While he doesn’t sell completed Brancopans, he has since released all the build files and instructions so that followers can create their own. “The files are now available on GitHub, along with video manuals, links to buy laser cut accessory dials and focusing aids (not necessary, but nice).” It’s free to download, and you can make a donation here.
“It’s a great camera, but what I love most of all about it is that since the files are all online for anyone to print for free, every few weeks, I get a message or get tagged in an Instagram post, where someone on the other side of the world has built my design, is using it to take incredible pictures, and loving it themselves,” Moses says. “It’s been greatly satisfying to watch.”

In the meantime, Moses continues to focus on new projects. “I keep a ‘dream camera journal’ with ideas and drawings and diagrams that I go back to frequently,” he tells us. Stay tuned via the CAMERADACTYL Shop.
Pro Tip: “A camera is just a box that holds film inside and keeps light outside. Start with a pinhole camera if you haven’t ever made one before. Keep it simple at first. Small projects and quick successes can be built upon, and are less likely to bog you down in a seemingly unfinishable project.
“Build up to more complicated mechanical and maybe electrical systems. There are no mistakes; there are just failed prototypes, which are necessary to learn from and improve the next version. I have never released a camera without at least seven visually identical cameras sitting in a drawer somewhere that range from a total brick, to semi-functional. Engineering is an iterative sport. It requires ‘failures.’”
Follow CAMERADACTYL Cameras on Instagram at @cameradactyl.
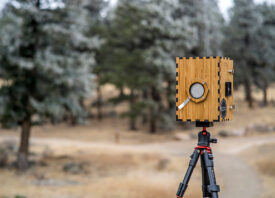
The ‘Big Tuna’ by Samuel Trachsel

“My interest started a long time ago with building simple pinhole cameras, which is a very good way to start,” Samuel Trachsel tells us. “After building really tiny and then slightly bigger ones, I started to take a lot of pictures on direct positive paper.

“Direct positive images on paper straight out of the camera have a very cool feel to them; they are all unique and never exactly repeatable. That’s when I ultimately gave in to the urge to go bigger in size. After finding a Lomo 600 Lens on eBay for next to nothing, I had to do something with it. Without ever having built such a large camera, I just started building, without knowing exactly if or how it would work.

“My favorite camera to date would definitely be my ‘Big Tuna.’ It’s such a weird, bulky, and cumbersome camera that is really hard to operate, and the pictures have such crazy colors. I love it! Creating 16×20 color pictures straight out of the camera is just way too cool. Seeing the color picture appearing in daylight is just magic. You can read more about it here.”

Pro Tip: “It is good to think carefully about these projects, but don’t overthink it. Even if you don’t have any previous knowledge of camera craftsmanship, you fit right in and you are absolutely capable of taking great cameras and pictures–just do it!”
Follow Samuel Trachsel on Instagram at @trachselsam.
The ‘Quarantena’ camera by Sandeha Lynch

“My first attempt at a pinhole camera in 2003 was a simple wooden frame that could take paper negatives,” the artist, sculptor, and creative technician Sandeha Lynch remembers. “I added a Polaroid back and then began modifying cheap medium format cameras, constantly adjusting to get a result I was happy with.

“By then, the building bug had taken me over, so I had to try out some other camera types as well. I wasn’t alone in this pursuit either; other photographers were generously sharing their findings and experiences on forums. There was a growing trove of information online on making pinholes and adapting other cameras.
That was seventeen years ago. “I’ve since made view cameras from 3″x3″ up to 4″x5″, point-and-shoots for 4″x5″, and a stream of pinhole cameras from 35mm to 8″x10″,” Lynch tells us. “Some of the builds carry lenses, while most are dedicated pinhole cameras, the most recent ones using 120/220 roll-film backs.
“I’m quite fascinated to watch today’s makers designing new cameras using 3D printing technology, sometimes adapting their engineering skills to the task, sometimes learning a raft of new skills to bring their concepts into the real world.
“But I’m old-school and more at home with using simple metal and woodworking hand tools. I can’t use a lathe, but I’m pretty good at wielding a file. I like hardwoods and brass, and making a camera this way reflects how the very earliest cameras were made, often by early photographers themselves.

“I guess my most recent pinhole camera is the one I am most proud of, if only because it threw up the greatest number of challenges and I had enough experience to resolve them. It’s called the Quarantena, and it is so new that I’ve hardly used it yet. It’s 6×8 format and built around a Fuji GX680 220 roll-film insert. I used cherry wood and maple and a handful of metal parts. I designed and built it at the beginning of the COVID-19 lockdown (hence the name), and got to test it as conditions gradually improved.”


Pro Tip: “The pinhole camera offers the widest range of creative camera options. I’ve seen some made with eggshells, vegetables, discarded packaging, Legos, or even an assortment of broken camera parts cobbled together. After all, it’s only a light-tight empty space, with a receptive surface for the photographic emulsion at one end and a hole at the other.
“Making a camera that is durable and reusable requires some thoughtful planning. In deciding how to approach a new camera, the first decision is likely to be the film surface and dimensions. Sheet (film, tin, or glass), Instant pack, or roll film? It’s best to choose a familiar substrate the first time. Once that is decided, you build forwards from there.”
Follow Sandeha Lynch on Instagram at @sandehalynch.
Steve Irvine’s ceramic cameras

“I have been a potter for over 50 years, and I’ve had a passion for photography for just as long,” the Ontario-based artist Steve Irvine says. “It made sense at one point to combine the two creatively, and pinhole cameras were the perfect solution. A pinhole camera can be just about any size or shape, and there is no limit to the forms that can be made with clay. There are endless possibilities.
“Having a camera that requires a darkroom to change the negative after each image means that I must think carefully about each photograph attempted. Instead of the ‘click-click-click’ of a digital camera, I might spend hours preparing for one image, which makes me think differently about the image-making process.

“My favorite ceramic camera so far would be a large, lidded cylinder with a flat front. The metal disk pinhole is set into the flat front, and the distance to the curved back wall where the negative is held is 10 cm. Since the pinhole is about .3 mm in diameter, this gives an equivalent aperture of about f/300, which is a good number for a reasonably sharp image. I use photo paper for my negatives, cut into pieces of 5×8 inches.”

Pro Tip: “Pinhole cameras must have an absolutely light tight construction made from totally opaque materials; I have a section on my website about how to construct a ceramic camera. The exposures are usually long; for instance, my photo paper negatives often take an hour or more for the exposure, so the camera must be able to sit solidly once the exposure starts. Since the exposures are long, choose subjects where the passage of time is something of importance for the image. Experiment, and keep good notes about what you’ve done.”
Follow Steve Irvine on Instagram at @steveirvine.clay.
Matt Bigwood’s beer can cameras

Matt Bigwood’s roots in camera-making date back to the 1980s, when his uncle Brian Candy introduced him to darkrooms and pinhole cameras. “We made a pinhole camera from a biscuit tin and took a picture in the garden,” he remembers. “When I developed the sheet of paper, there was that moment of amazement as I saw the image appear under the safelight.”
As an adult, he returned to pinhole cameras–this time using beer cans and six-month-long exposures. “The equipment for these cameras was very simple: an empty beer can with the top removed and a hole made with a needle or pin, a card lid for the can held on with gaffer tape, and a sheet of 5”x7” black and white photographic paper inside,” he says.

“I set up five cameras at different heights and locations around a school building, hoping I might get a good composition with the building framed by the sun’s rays. They were secured to fences and lamp posts using cable ties and tape.
“Two of the cameras were damaged, probably by over-inquisitive children or a ball hitting them. One can was deformed and the pinhole got covered by the paper inside, so it didn’t produce an image. I had a quick look at the other cameras every week or two to make sure they were still in place.

“To make a six-month-long exposure, the camera needed to be pointing south towards the sun. Composition was an educated guess–it needed to be south-facing and the bottom of the can raised slightly to get more sky in the picture. Because the paper was wrapped around the inside of the can, it gives a distorted arc shape to the sun’s path across the sky. Despite being used during one of the wettest summers in the UK for many years, the cameras still recorded the sun’s path across the sky.
“My biggest concern was that someone would think they were junk and throw them away before the exposure had finished. Luckily, this didn’t happen, probably because most of them were more than six feet from the ground and hard to reach.

“One of the interesting things about the long exposures was that so much had happened in front of the cameras during those six months. Children had been playing in front of them in the playground, the sun had risen and set each day, and the seasons had changed–and only the sun rising and setting was recorded in the image.”
Follow Matt Bigwood on Flickr.
Antoine Loncle’s Afghan camera

The Malaysian film photographer Antoine Loncle first started researching camera builds for practical purposes; he wanted an 8×10 camera but didn’t want to spend a fortune buying one, so he made his own. “This DIY camera is based around the Afghan camera style,” he tells us. “This is to say that the camera is both able to capture and also develop a paper negative (or positive), resulting in a print. It’s a camera that’s had quite an interesting history, and I would encourage anyone to look into it.
“A few people were very helpful during my research. First is Lukas Birk; he is responsible for much of the research done around Afghan cameras and how they have become popular over the past few years. Without his work, it wouldn’t have been as easy to build. Another is Joe Van Cleave on YouTube. He has quite a few videos on box cameras, using direct positive paper and such, plus he’s a super friendly guy. Last is Brendan Barry (featured above)–look him up!”
“I wanted to go big, so I designed my camera to be able to shoot up to 8×10 with comfortable space to develop and a decent close focusing ability. It was initially intended to shoot only with direct positive paper, as I had no way of inverting a paper negative, like traditional Afghan cameras do.
“Typically, these cameras have an arm that holds the negative in a position where the camera is able to re-photograph the negative, creating the positive print. Scaled up to an 8×10 size, it would have been quite a large arm, so I decided not to do that. I still wanted to be able to produce negatives, so I recently added a way to produce contact prints all within the camera itself, and I’m pretty happy with it.”
Pro Tip: “Plan well in advance. Do the research, draw up some plans, and make sketches, tests, and mockups. Camera builds can be as simple or as complex as you want, so find something that suits your needs and skill level. I had little skills when it came to woodwork, so I chose a simple box camera and sought the help of my grandfather for the build.
“Also, for me, I was keeping a very budget-conscious attitude to the build. It’s very easy to fall down the hole of expensive lenses and hardware, which is fine, if that’s what you’re after. Just don’t think that you need a $2000 petzval lens to make a good camera. Pin-holes and plastic lenses can produce some fantastic results.
“I’m always happy to chat to fellow camera geeks, so if anyone has any questions about it, feel free to contact me! I have made a video or two on my YouTube channel as well as a big writeup on the build process and some of the details on my website. I share my experience with the camera quite often as well on my Instagram.”
Follow Antoine Loncle on Instagram at @loncle.bonkle.
Nicole Small’s multi-pinhole box camera

“My journey into DIY camera building began in 2017,” the Montreal-based artist and photographer Nicole Small remembers. “The first attempt was built purely out of curiosity after having bought a box camera for pinhole photography that was 4×5 in size.
“I wanted to create something different, and so I went to a local dollar store and bought a circular gift box and created a pinhole camera with it.” That was her first. After that, she embarked on building a 5×7 box camera–and then another.

“I wanted to create something unique with the 5×7 wide angle box camera, and so I purposely attached a smaller-than-needed pinhole, which led to images with a particular look and a strong vignette.” More followed, and she uses them to this day–each for a different purpose.
“My first 5×7 camera build is great for portraits, having no visible distortion, and my 8×10 build is too,” she tells us. “I also enjoy my multi-pinhole box camera, built for World Wide Pinhole Day 2020, which gives off everything that the other builds can’t.”


Though there are some things she’d change, the multi-pinhole box camera ranks among her favorites to date. “The box camera shell is made with black foam core,” she explains. “I used a soda can to make the base for the pinholes, which I cut as one large piece to cover the pinhole area. For making the pinholes, I used a sewing needle. I made sure not to go further than the point of the needle with each hole to make sure that the holes were more or less the same size. The pinholes were guided for even separation and placement with the use of an ice cube tray.

“I have a black flap that covers the whole front end of the box camera and is removed just before exposure with selected holes, which are covered with black tape when not in use, uncovered. Two strips of velcro are used to hold the 4×5 film holder in place and cell insulating foam tape is placed on the edges of the back of the box camera to ensure that the film holder is placed to match up with the box center and to help make certain that no light will enter into the box camera on either side.
“The box camera is made perfect for an arm’s length distance for self-portraits, making distortion minimal and making it easy to remove and replace the black flap onto the box camera with minimal self-displacement. I chose circular shafts instead of the typical square just to make it different and I was also curious as to how it would turn out. I also tried to lengthen the circular shafts with black construction paper. Exposure for each pinhole is approximately 1 minute and 30 seconds under studio lighting.”
Pro Tip: “If building a camera is on your mind, just go for it. I guarantee you will not regret it, but beware: you might become addicted! There are a lot of resources out there that can help on YouTube, photography forums, and even on Instagram, but what is even better to do is to just reach out and ask someone who you know has experience in camera building. Not everyone will be willing, but I personally enjoy when others reach out to me.”
Follow Nicole Small on Instagram at @nicolesmall_oneonone.