Search this site
How to Save an Underexposed Photo Using Lightroom (Sponsored)

“I have a serious addiction to abandonment,” writes Oslo-based fine art photographer Britt Marie Bye of her restive spirit and thirst for the unknown. Her yearning to make sense of her own childhood has taken her down the ragged and unpaved roads of other people’s memories, long since obscured by the veil of dust and time. Her images emerge as if from the pages of a storybook, existing in realm that is both inhabited and impenetrable. Since she so often works under cloudy skies, Bye has mastered the art of turning the dreary into the enchanted, and in this tutorial, she takes us behind-the-scenes into her process of salvaging an underexposed photograph using Adobe Lightroom.
Britt Marie Bye: “Hi, and welcome to this tiny tutorial on how to rescue an underexposed photo (If you’re shooting in RAW-format that is. If you’re not then I’m deeply sorry for your loss).
“If, like me, you’re venturing out in the dark and frozen Nordic winter to shoot in an abandoned cabin in the middle of nowhere, using only natural light from one window, make sure you shoot in RAW-format. Then you can fix almost everything using your newly developed Lightroom skills.”

“First let’s introduce the radial filter. Circle the window, uncheck invert mask at the bottom of the page and…


…adjust exposure and any other values you want, based on how good/bad your photo looks.”


“Then let’s be unoriginal and choose radial filter again. Place it over the curtain and adjust to enhance the texture of the curtain and the window frame. Or whatever you need to enhance.”


“Use radial filter to cover all parts of the floor and enhance. You will probably need to use three circles to cover the entire floor (You could use adjustment brush for this too, but I’m just really good at making those circles).”


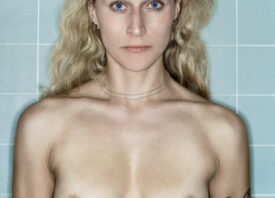
“Then radial filter again to adjust the model and the light from the window that illuminates her. (Last time with the circles, I promise).”


“Use adjustment brush on all the wallpaper on both sides of the window and around the model. To use this brush, just left click and hold whilst you paint. When you’ve painted the wanted area, you can adjust accordingly. I’ve chosen to enhance the wallpaper more.
“I prefer to set my filters to a darker setting so I can see where I’m painting/which areas I’m covering. Then you start adjusting. Now you can go crazy with the coloring, or do as me: stay within the conservative levels.”


“To go crazy with the colors, press the x on the colors tab at the bottom. Just make sure you did a much more thorough job with the paintbrush than I did if you’re choosing to change the color radically. No room for laziness here.”

“Go to tools and choose ‘Crop’’ Then choose the cropping you want. I usually crop mine at 8×10, just because that’s the size I prefer, and I’m a little bit set in my ways. You however are completely free to use whatever cropping you prefer, and if you’re a nonconformist, you can even choose ‘custom.’”


“With your newly cropped and much more tidy image, you go down until you find the ‘effects’ tab and give your photo a vignette after your own taste. I chose to highlight the model even more.”


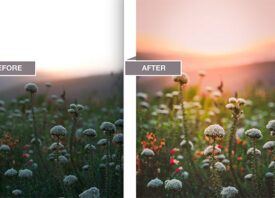
“Press the before/after button to see if you find your edits satisfactory. Drum roll optional.”

“Then to finish it, off press once on the photo to zoom in. Look at the amount of grain in your shot (mine is quite grainy since it was so underexposed). Find the luminance tool by scrolling down in the right column toolbar. I set mine at 40, just to make sure she looks soft and pretty, and not so very gritty.”


“If you made it to the bottom of all this, thank you so much for staying with me. I hope I was able to make my take on Lightroom as an editing tool understandable for you!”

Adobe is a Feature Shoot sponsor.